High-Quality Natural Wood Panels Manufacturers and Suppliers In China. We product: Wood Acoustic Panels PET Panels
Avoid your inquiry is delay response, please enter your WhatsApp/Skype along with the message, so we can contact you at the very first time.
We will reply you within 24 hours. If for urgent case, please add WhatsApp/WeChat: +86-13678899682 directly.
Bad sound can ruin a space. Echo makes speech hard to hear, and noise makes people tired. If you guess during installing a PET acoustic panel, you can end up with gaps, poor acoustic results, and a messy finish. This guide gives you a simple, proven method—so your panels look clean and your room sounds better.
To install PET acoustic panels, plan your layout, prep a clean wall or ceiling, then fix panels using adhesive or a z-clip system. Cut panels with a straight edge and utility knife, keep edges aligned, and press with even pressure. The best method depends on whether you need a permanent bond (adhesive) or a removable clip system (z-clips).

Before installing: what is a PET acoustic panel and why does it work?
Wall or ceiling: where should an acoustic panel go for the best acoustic performance?
Measure and mark: how do you plan a panel layout for a seamless acoustic wall?
Surface prep: how clean does the wall panel area need to be before adhesive?
Adhesive method: how do you apply adhesive for strong sound absorption results?
Z-clips method: when should you use a z-clip or wall z-clip for panel installation?
Cutting panels: how to use a utility knife and straight edge to fit panels to fit?
Corners, outlets, and perimeters: how do you finish edges of the panel neatly?
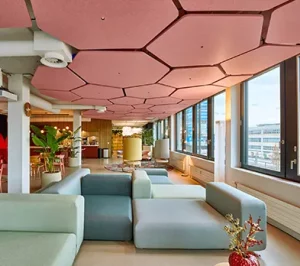
Ceiling panel projects: how do you install PET felt panels on a ceiling safely?
Quality checks + case study: what to inspect after the panel is installed?
A PET acoustic panel is an acoustic product made from polyester fiber. PET stands for polyethylene terephthalate—a durable, recyclable plastic commonly used in bottles and textiles. In panels, that material becomes a porous felt that helps with sound absorption.
In plain terms: a room has sound waves bouncing around. A sound-absorbing panel reduces those reflections. That improves sound quality in any space—especially meeting rooms, offices, classrooms, studios, restaurants, and other commercial spaces. PET panels are also impact resistant, which makes them practical in busy buildings.
From our factory experience, PET felt is popular because it’s eco-friendly, often made from recycled content, and it’s easy to install compared to heavy construction systems. If you need clean visuals and real acoustic treatment, PET is a solid, modern choice.
Where you install the acoustic panel matters as much as the panel itself. The goal is to treat the biggest reflection points.
On a wall panel area: panels reduce echo from side reflections and “slap back” sound.
On the ceiling: panels help reduce overhead reflections, which is huge in open offices and big rooms.
A quick way to decide:
If speech sounds harsh or “ringy,” focus on the walls first.
If the room feels loud overall, add ceiling coverage.
You don’t need to cover every inch. A smart layout can deliver strong noise reduction. Also, if you can add a small air gap behind the panel (often possible with a clip system), you may improve low-frequency absorption compared with a panel glued tight to the surface.
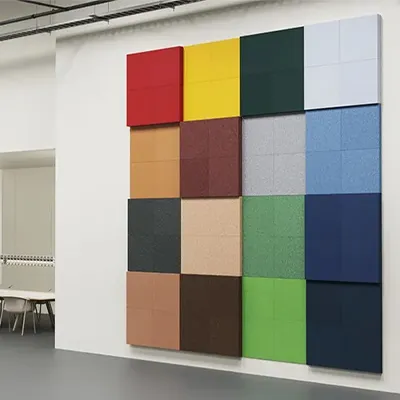
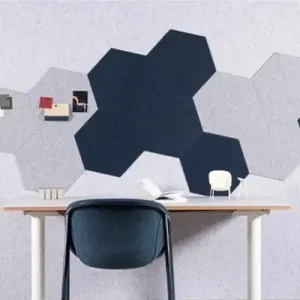
Good panel layout is where professional results come from. Start with a sketch. Decide if you want a full acoustic wall or a feature area that becomes a design element.
Here’s a simple planning routine:
Choose the panel location (main reflection wall, behind speakers, behind desks).
Measure and mark the centerline of the area.
Draw a horizontal line on the wall to keep rows straight.
Dry-fit a few panels to confirm the pattern and alignment of the panel.
If your panels are meant to be butted together, mark the row start point carefully. If you want a small reveal line, keep spacing consistent. Either way, aim for a clean, seamless look.
Layout checklist table
| Step | What to do | Why it matters |
|---|---|---|
| Plan the pattern | Decide rows/columns or feature blocks | Better visual appeal |
| Mark center + level line | Use a level and pencil | Keeps panels level and aligned |
| Confirm edges + perimeter | Check corners and trim zones | Avoid awkward slivers |
| Dry-fit | Test 2–3 panels | Fewer mistakes later |
If you use adhesive, surface prep decides success. The surface of the panel will only bond well if the wall is solid, dry, and dust-free.
Before installing panels, confirm:
Surface is clean (no dust, oil, loose paint, or powdery plaster)
The wall is flat enough that the back of the panel makes full contact
Moisture is not trapped (especially on fresh concrete)
Simple steps:
Wipe the wall and let it dry.
If paint is peeling, scrape and patch.
If the wall is glossy, lightly scuff for better grip.
This is the unglamorous part, but it prevents panels falling later. When contractors ask me why a panel failed, it’s usually the surface—not the product.
The adhesive method is the fastest for many indoor projects. Use a good construction adhesive and a caulking gun. Then apply adhesive in a pattern that supports the full panel without creating lumps.
A practical pattern:
Run a perimeter line (light) near the edge—don’t squeeze it out.
Add 3–5 vertical beads in the middle.
Press the panel onto the wall with even pressure.
Key tips that help:
Keep adhesive around the edges controlled so it doesn’t seep from the edge of the panel.
Work from one corner and roll outward to avoid trapped air.
If your panels come with surface textures, protect the face while pressing.
Adhesive guide (simple rules)
Use a consistent bead thickness.
Don’t over-apply (messy and wastes glue).
Press, hold, and check that each panel is installed flat.
This method gives a clean finish and stable bond. It’s also good for printed panels if you want a precise graphic layout—just make sure the wall is level and your layout lines are accurate.
If you want panels that can be removed later (maintenance access, design refresh, or rental spaces), use z-clips. A z-clip is a simple fastener system: one piece mounts on the wall, the other on the panel, and they lock together.
Choose z-clips when:
You need a “serviceable” wall (panels can come off)
You want a straighter finish on uneven walls
You want to create an air gap for better acoustics in some designs
Methods for installing with clips usually look like this:
Mount the wall clip strip (use anchors if needed).
Mount the panel clip strip on the panel.
Hang the panel and slide/seat it until level.
Use a use a level every few panels. If your first rail is crooked, every panel after it will drift. Clip systems are also helpful if you plan to use mechanical support for ceiling or high-traffic areas.
| Method | Best for | Pros | Tradeoffs |
|---|---|---|---|
| Adhesive | Fast installs, flat walls | Clean, quick, low hardware | Harder to remove |
| Z-clips | Removable designs | Serviceable, can improve alignment | More steps, more hardware |
Most PET felt panels cut easily with a utility knife. The trick is to cut cleanly so your seams look sharp.
Tools:
straight edge (metal ruler is best)
utility knife with a fresh blade
pencil + tape measure
cutting mat or scrap board
Cutting routine:
Mark your cut line.
Place the straight edge firmly.
Score the felt with multiple light passes (don’t try one deep cut).
Finish the cut and test-fit.
When you’re cutting around trim, outlets, or irregular corners, do small test cuts first. The goal is panels to fit without forcing them. Forcing creates gaps and ruins the alignment of the panel.
Corners and the perimeter are where “okay” installs become “great” installs.
Here are three clean finishing options:
Butted together panels with tight joints (simple and modern)
Small reveal gaps for a grid look (great for modern offices)
Add trims or shadow lines if the design calls for it
For outlet areas, keep your cutouts tight and square. For inside corners, decide whether you want:
one panel to run full height and the adjacent panel to butt into it, or
a symmetrical split.
This is also where the rail/clip system can help. Clip mounting gives you more control if walls are not perfectly straight.
Installing on a ceiling changes everything: gravity works against you. For any ceiling panel project, I recommend a mechanical approach for safety in commercial environments—either clips or approved mechanical fasteners. In some cases, installers combine clips + a small amount of adhesive as a backup.
Ceiling tips that matter:
Work with two people whenever possible.
Wear gloves and eye protection.
Confirm the substrate (concrete, gypsum, metal frame) and choose the right anchors.
Use a level line so panels stay straight across the acoustic ceiling.
If you do use adhesive overhead, follow the adh
Once the panel is installed, take 10 minutes for a final check. It prevents call-backs.
Final inspection checklist
Panels are level and aligned
No adhesive squeeze-out on faces
Tight joints and clean edges
Consistent pattern across the wall or ceiling
Secure corners (no lifting edges)
A contractor installing PET panels in a meeting room wanted fast results. They used adhesive but skipped surface prep. Two weeks later, edges started lifting. The fix was simple but annoying: they removed panels, cleaned the wall properly, then re-installed using the same adhesive pattern with better pressure and layout lines. Result: stable panels and improved acoustic performance.
That’s why I always say: the product matters, but process matters more.
If you supply building materials, design interiors, or manage commercial projects, you need more than “panels.” You need consistent quality, stable delivery, and customization that fits your market.
We manufacture high-quality PET and wood acoustic panels in China and support OEM/ODM programs for distributors, importers, designers, and brand owners. We can help you:
choose the right panel type for your acoustics goals
match colors, thickness, and patterns
prepare packing and labeling for your channel
deliver repeatable quality for long-term supply
If you want a clean quote, send us your room size, wall/ceiling choice, and target look. I’ll share a practical recommendation and a detailed installation note set for your installers.
What adhesive should I use for installing PET acoustic panels?
Use a quality construction adhesive recommended for interior wall panels, applied in controlled beads. Make sure the surface is clean and dry, and press with even pressure.
Can I install PET acoustic panels on a ceiling?
Yes, but ceiling installs should prioritize safety. A clip system or mechanical fasteners usually works best, especially in commercial spaces.
Do z-clips make panels removable?
Yes. Z-clips create a clip system that lets you remove panels later for access or upgrades, while keeping alignment neat.
How do I cut PET felt panels cleanly?
Use a straight edge and a sharp utility knife. Make several light passes for a clean cut, and test-fit often.
Should panels be butted together or spaced apart?
Both work. Butted joints look seamless. Small gaps can create a modern grid look. Choose based on your design goal and installation tolerance.
Will PET panels soundproof a room?
PET panels improve sound absorption and reduce echo, but “soundproof” usually requires construction changes (mass + sealing). PET panels are best for acoustic treatment and noise reduction inside the room.
Start with layout: measure, level lines, and plan the panel location.
For walls, adhesive is fast; for removable systems, use z-clips.
Clean surfaces matter—most failures come from dust or weak paint.
Cut with a straight edge + utility knife for neat edges.
For ceiling panel work, use mechanical support for safety.
A consistent process delivers better visual appeal and stronger acoustic results.