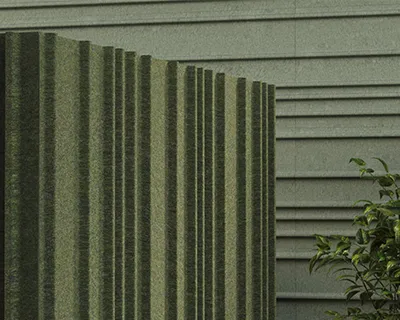
ألواح الخشب الطبيعي عالية الجودة مصنعي وموردي ألواح الخشب الطبيعي في الصين. نحن المنتج: الألواح الخشبية الصوتية ألواح الخشب الصوتي ألواح PET
تجنب تأخير الرد على استفسارك، يُرجى إدخال واتساب/سكايب الخاص بك مع الرسالة، حتى نتمكن من الاتصال بك في المرة الأولى.
سنرد عليك في غضون 24 ساعة. إذا كانت الحالة عاجلة، يُرجى إضافة واتساب/وي تشات: +86-13678899682 مباشرة.
Poor installation ruins good products. Panels can look uneven, edges can open, and sound control can disappoint. That wastes time, labor, and material. The solution is to follow a clear step-by-step guide, choose the right mounting method, and prepare the wall or ceiling properly before you install the first panel.
To install PET acoustic panels, first plan the layout, prepare a clean and dry surface, mark the panel position, then fix each acoustic panel with the right adhesive, clip, screw, or other mounting hardware. The best method depends on the substrate, whether the panels go on a wall or ceiling, and whether you want a permanent or removable installation. BNPANEL’s current installation guide specifically recommends layout planning, clean substrates, straight cuts, and either adhesive or Z-clip style systems depending on the project.
What should you prepare before you install PET acoustic panels?
Which mounting method is best: adhesive, clip, or screw?
How do you measure, mark, and align the first panel?
How do you cut PET felt panels cleanly and safely?
How do you install PET acoustic panels on walls?
How do you install PET acoustic panels on a ceiling?
How do you keep adjacent panels flush and seamless?
What mistakes reduce acoustic performance and visual appeal?
How can you optimize panel layout for better acoustics?
Why do B2B buyers choose customized PET acoustic wall solutions?
Before you install any PET acoustic panels, prepare the room and the surface. A clean substrate is one of the most important steps in the installation process. Dust, grease, loose paint, or moisture can weaken the bond if you use adhesive. BNPANEL’s PET installation guide and other PET felt installation references both stress the need for a flat, clean, dry surface before fixing the panel.
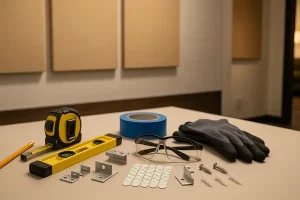
Your tool list should usually include a tape measure, pencil, straight edge, utility knife, sharp blade, use a level or use a laser, adhesive or mounting clips, screws if needed, and a clean cloth. If the panels will be placed across an entire wall, it helps to sort them first by color tone and check the direction of the felt or decorative face before you start. BNPANEL’s own installation article recommends layout planning and straight-edge cutting before fixing the first panel.
A simple prep checklist:
| البند | ما أهمية ذلك |
|---|---|
| Clean wall or ceiling | Helps adhesive or clip systems hold securely |
| Accurate marking | Keeps the panel grid straight |
| Correct tools | Reduces waste and rough edges |
| Dry substrate | Protects bond strength |
| Level reference line | Helps the first panel stay aligned |
| Product inspection | Avoids installing damaged panels |
If the room has uneven walls, humidity issues, or heavy service equipment, plan the fixing method more carefully. In B2B projects such as offices, classrooms, restaurants, lobbies, and theaters, surface preparation often decides whether the finish looks professional or not. BNPANEL presents PET systems as suitable for commercial acoustic projects because they combine acoustic performance, lightweight handling, and OEM/ODM flexibility.
The best mounting method depends on the substrate, service conditions, and whether the panels need to be removable later. For many interior wall jobs, adhesive is the fastest option. For projects that may need future access or replacement, a clip system or mechanical fixing can be better. BNPANEL’s current guide says the most common methods are adhesive for permanent bonding and Z-clip style systems for removable installations.
Use adhesive when the wall is flat, dry, and stable. Construction glue or approved high-bond adhesive works well for many PET felt surfaces. Use clip or mounting clips when you need cleaner removability or want a mechanical solution on feature walls. Use screw fixing or other mechanical fasteners when the substrate is difficult, the panel is large, or the project requires stronger fixing. Armstrong’s felt panel instructions also note that adhesive installations require conditioning of the room, adhesive, and panels before application, which is a good reminder that environmental conditions matter during installation.
A quick method comparison:
| الطريقة | الأفضل لـ | Main Benefit | Main Limitation |
|---|---|---|---|
| مادة لاصقة | Flat interior walls | Fast and seamless look | Less removable |
| Clip system | Premium walls, removable access | Cleaner removal and replacement | More layout work |
| Screw / fastener | Uneven or demanding surfaces | Stronger mechanical hold | Visible fix points unless concealed |
| Ceiling hardware | Suspended baffles or overhead mounting | Safer overhead fixing | More installation steps |
For commercial projects, choosing between glue and clips is not just a technical issue. It affects labor time, future maintenance, and overall acoustic wall design.
The first panel controls the whole layout. If the first panel is crooked, the rest of the installation can drift, leaving visible gap lines and poor alignment. That is why marking is one of the most important steps in the job.
Start by measuring the wall or ceiling and deciding whether you want a centered layout, edge-to-edge coverage, or a framed pattern. Then mark on the wall or ceiling where the panels will be placed. Use a level line or laser line for the first row. BNPANEL’s installation guide specifically highlights planning the layout and keeping edges aligned before pressing panels into place.
When you align the first piece, check both horizontal and vertical references. If the wall is not perfectly square, adjust visually from the most important sightline. In a reception wall, that may be the center view. In a corridor, it may be the top edge. A professional finish comes from smart layout, not only fast work.
Most PET acoustic panels can be cut on site with a utility knife, sharp blade, and straight edge. That is one of the reasons they are popular for custom interior work. The fiber structure is firm enough to hold shape but still workable enough for on-site trimming. BNPANEL’s step-by-step guide recommends a straight edge and utility knife for clean cuts.
The key is to cut slowly and support the panel properly. Mark the line clearly. Place the straight edge firmly. Score several times instead of trying to cut through in one rough pass. This helps keep the edge of the panel neat. If you need cutouts for outlets, switches, or wall fixtures, measure twice before cutting. On ceiling projects, pre-cutting on a workbench is usually cleaner than trimming overhead.
Good cutting practice:
A neat cut helps both the aesthetic result and the acoustic wall layout.
To install PET panels on walls, start at the bottom or from a control line, depending on the design. If you are using adhesive, apply it to the back of the panel according to the manufacturer’s method. Then press the panel firmly and evenly onto the wall. If you use clips, install the mounting hardware first and then engage the panel into place. BNPANEL and other PET felt installation documents both describe these same basic steps: prepare, mark, apply fixing, align, and press securely.
If you are installing multiple wall panels, work in one clear direction and check each joint before moving on. Keep adjacent panels tight but not forced. If the design requires a visible gap between units, use spacers so the pattern stays consistent. If the design aims for a more seamless look, keep the edges flush and check every second or third panel with a long straight edge.
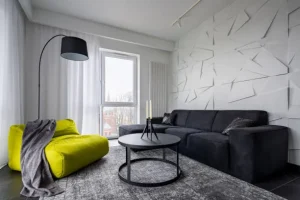
Wall installation usually works well for:
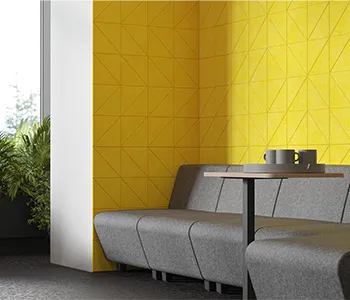
For buyers comparing finishes, PET acoustic panels work well when the goal is practical sound absorption with light weight and flexible installation. BNPANEL also positions its PET products as eco-friendly, recyclable, and suitable for wall and ceiling use in modern public interiors.
A ceiling installation needs more planning because gravity is now working against you. A small wall panel may hold well with adhesive alone on the wall, but overhead fixing often needs stronger support, especially in large-format systems, hanging baffles, or public-use spaces. BNPANEL’s ceiling treatment guidance points out that ceiling clouds, baffles, and PET ceiling panels should be selected based on installation method, target RT60, and project conditions.
For simple ceiling-mounted PET products, always check whether the fixing system is approved for overhead use. In many commercial jobs, installers prefer mechanical fixing, suspended systems, or rail-based systems rather than adhesive alone. Use the correct fastener, spacing, and support detail. On open ceilings, hanging clip systems or suspended baffles often give better absorption because they expose more surface area to sound.
If the project uses PET ceiling products for noise reduction in cafeterias, restaurants, offices, or classrooms, ceiling placement can greatly enhance reverberation control. BNPANEL’s ceiling articles explain that the best acoustic treatment for ceilings depends on whether you need tiles, clouds, or baffles, and that all three can help manage reflections in large rooms.
The best-looking PET wall uses good alignment and consistent joints. If one panel sits proud of the next, the whole wall can look unfinished. To keep adjacent panels flush, check the substrate first. Even the best panel will show problems if the wall behind it is bowed or uneven.
Use a level reference line, dry-fit panels before final fixing, and keep consistent pressure during adhesive installation. If the wall has noticeable variation, consider using battens, a subframe, or clip-based mounting to create a straighter base. This is especially important for decorative acoustic wall features in reception areas or high-visibility commercial interiors.
A few practical points:
A straight, professional layout improves both visual appeal and perceived product quality.
The most common installation mistakes are simple: poor layout, wrong adhesive, dirty substrate, bad cuts, weak fixing, and random placement. These do not only hurt appearance. They can also reduce acoustic performance.
For example, if panels are placed only where they “fit” rather than where reflections are strongest, the room may still suffer from reverberation. If the panel edges lift because the wrong glue was used, the wall will look poor and may fail early. If the panels are forced onto a warped substrate, the face can bow and the result will not look seamless.
Mistakes to avoid:
| Mistake | Result |
|---|---|
| Skipping surface prep | Weak bond |
| No layout plan | Crooked pattern |
| Dull blade cuts | Rough visible edges |
| Wrong fixing for ceiling | Safety risk |
| Poor panel placement | Less acoustic improvement |
| Uneven spacing | Cheap appearance |
| Using too little adhesive | Panel loosening |
| Using too much adhesive | Messy joints |
The best results come when installation is treated as both an acoustic job and a finish job.
To optimize layout, place panels where reflections are strongest. In many rooms, that means the main side walls, the wall behind the speaker or noise source, and the ceiling above the active zone. BNPANEL’s placement and office-acoustics articles emphasize that the best results often come from treating first reflection points and ceiling areas rather than covering random decorative spots.
If the room has speech problems, focus on the surfaces that reflect speech. If the room has broad noise reduction goals, spread the panel coverage more evenly across the space. If the goal is stronger low-mid absorption, increase treated area and use deeper systems or suspended products. Panels mainly improve echo and speech clarity; they are not a complete “soundproof” barrier by themselves. BNPANEL’s soundproofing articles make this distinction clearly in practical commercial applications.
This is why many B2B buyers ask for layout support, not just product. Good placement helps the product work harder and makes the acoustic solution more convincing to the end client.
Distributors, importers, architects, contractors, and OEM/ODM brand owners usually need more than standard stock panels. They need size flexibility, color matching, packaging control, and support across multiple projects. That is why customized PET wall systems are attractive in B2B channels.
As a professional manufacturer in China specializing in high-quality PET and wood acoustic panels, we focus on stable production, flexible customization, and export-ready support for global buyers. BNPANEL’s own product pages highlight OEM/ODM service, custom dimensions, multiple finishes, and project-oriented acoustic solutions for walls and ceilings.
على سبيل المثال:
For B2B buyers, that mix of performance, finish, and supply control is often more important than the lowest unit price.
A distributor needed PET wall panels for a chain interior project. The first samples from another source looked similar, but the density, edge finish, and mounting guidance were inconsistent. The risk was clear: fast installation on site might turn into rework and complaints.
The buyer switched to a higher-quality PET system with clearer installation guidance, tighter dimensional control, and better packaging. The panels mounted more cleanly, the joints stayed straighter, and installers lost less time fixing mistakes.
That is why installation support matters. A good panel is not just made well. It is also easier to install well.
What is the easiest way to install PET acoustic panels?
The easiest method is usually adhesive fixing on a clean, flat wall. For removable or premium installations, clip systems are often better. The best method depends on the substrate and whether the panels go on a wall or ceiling.
Can I install PET acoustic panels on a ceiling?
Yes, but ceiling installations often need stronger or more specialized mounting hardware than simple wall jobs. Suspended baffles, clips, or mechanical fixing are common choices for ceiling work.
What tools do I need to cut PET felt panels?
A utility knife, sharp blade, straight edge, tape measure, and marking pencil are usually enough for clean field cuts.
Do PET acoustic panels improve acoustics or soundproof a room?
They mainly improve room acoustics by reducing reflections and reverberation. They are not the same as full structural soundproofing.
Can PET panels be installed with screws?
Yes. Screws or other mechanical fasteners can be used, especially on difficult substrates, larger panels, or where stronger fixing is required. Clip-based systems are also common.
Are PET acoustic panels eco-friendly?
Many PET acoustic panels are marketed as recyclable and made from polyester fiber. BNPANEL describes its PET systems as lightweight, recyclable, and suitable for modern interior acoustic use.
Start every PET acoustic panel installation with a clean, dry, flat substrate.
Choose the mounting method based on substrate, removability, and whether the panel is on a wall or ceiling.
Use careful marking and alignment so the first panel controls the whole layout.
Cut panels with a sharp blade and straight edge for clean visible joints.
Ceiling installations often need stronger or more specialized fixing than wall applications.
Good layout improves both visual appeal and acoustic performance.
PET acoustic panels work best when they are installed correctly and placed where reflections are strongest.
For B2B buyers, high-quality panels plus clear installation guidance usually mean faster installation and fewer claims.